Showing posts with label Vegan. Show all posts

Friday, January 10, 2014

Gluten and Nut Free Vegan Magic Cookie Bars

Disclaimer: I call these nut free but they do contain coconut. The FDA requires food that contain coconut to be labeled as containing tree nuts, however coconut is not a botanical nut. Click here for more information about tree nut allergies.

I love the Magic Bars at Snowbasin. I figured it wouldn't be too hard to make a version Tommy can eat. The recipes I found online all used graham crackers for the crust, but since I haven't made a Tommy safe graham cracker yet, I went with quick oats. The crust doesn't look like it will stick together, but if you press it firmly into the pan and then carefully pour the caramel on top it will work. Refrigerate the bars overnight before you try to cut them. They are a little crumbly but they are so rich and so delicious. I intentionally didn't calculate the nutritional info for these. 


Gluten and Nut Free Vegan Magic Cookie Bars

1 can coconut milk
2/3 cup brown sugar
1/2 tsp salt, divided
1/2 cup Earth's Balance Vegan Buttery Sticks
2 cups gluten free quick oats
2 Tbsp soynut butter
2 Tbsp sugar
1/4 tsp cinnamon
2 cups Enjoy Life mini chocolate chips
1 1/2 cups finely shredded coconut

1. Preheat oven to 350°F. Line a 9 x 13" baking dish with parchment paper.
2. In a small saucepan, combine the coconut milk, brown sugar and 1/4 tsp salt. Bring to a boil, reduce heat and simmer for 10 minutes, stirring occasionally.
3. Melt the Earth's Balance and soynut butter in a large microwave safe bowl.
4. Stir in the oats, cinnamon, sugar and remaining 1/4 tsp salt.
5. Press the oat mixture into the baking dish using the back of a cup measure. Carefully pour the caramel on top.
6. Layer the chocolate chips and then the shredded coconut. Gently press the coconut and chocolate chips into the caramel.
7. Bake for 25 minutes until the coconut is toasted and the caramel bubbles up around the edges.
8. Cool and then refrigerate overnight. Then cut into squares.

Saturday, November 16, 2013

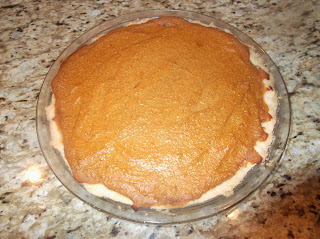
Recipe Trial 2 for Thanksgiving, Pumpkin Pie

I think pumpkin pie is one of my absolute favorite parts of Thanksgiving dinner. This year I want Tommy to be able to share in the joy of creamy, spiced pumpkin deliciousness. Last year we made a pumpkin pie with coconut milk and it was good, but I could taste the coconut in it and it just wasn't as good as a regular pumpkin pie. 

Now that I have a pie crust recipe that I love, it's time to start working on the filling for the pie. The best part of baking a vegan pie is you can taste the filling before you bake it to adjust the seasonings if you want! I already had a container of extra firm tofu so I used that in the pie. It made the texture a little grainy, but the taste was still good. Silken tofu would definitely blend better. Since it's a gluten free pie crust, I didn't bother with pie weights during the first phase of baking. The pie crust didn't bubble up at all. This pie was delicious and the filling was really easy to make. Feel free to substitute any pie crust recipe or store bought if you can.


Vegan Gluten Free Pumpkin Pie

For the crust:
3 Tbsp coconut oil
4 Tbsp vegetable shortening
3/4 cup potato starch
1/2 cup sorghum flour
1 Tbsp sugar
1/2 tsp salt
1/2 tsp guar gum
1/4 cup cold water

For the pie filling:
2 cups pumpkin puree
14 oz tofu (silken or medium firm would be best)
1/2 cup white sugar
1/2 cup brown sugar
1 tsp cinnamon
1/2 tsp ground ginger
1/2 tsp salt
1/2 tsp allspice or 1/4 tsp cloves

For the crust:
1. Measure out the coconut oil and shortening into small pieces and freeze for 10 minutes.
2. Process the remaining crust ingredients except for the water in the food processor. Add the shortening mixture and process until it looks like coarse crumbs.
3. Add the water and process until it forms a ball.
4. On a large piece of plastic wrap, press the dough into a 4 inch disk. Wrap the dough and freeze for 15 minutes.
5. Press the dough into a pie plate. Freeze the dough for 15 minutes.
6. Preheat the oven to 375°F.
7. Bake pie crust for 25 minutes. Meanwhile, prepare pie filling.

For the pie filling:
1. Combine all the pie filling ingredients in a food processor. Process until smooth. Taste filling and adjust seasoning if necessary.
2. Pour into partially baked pie crust. Bake for an additional 25-30 minutes.


Variation, Mini Pumpkin Pies

For 24 mini pumpkin pies, double the crust recipe. After crust step 4 above, press 1 inch pieces of the dough into the bottom of regular sized muffin tins. Skip step 5. For step 7, bake for 15 minutes. Then prepare a single recipe of the pie filling exactly as stated above. Pour the pie filling into the mini crusts and bake for an additional 15 minutes, until the edges of the pie filling are brown.